Are you still using only manual testing to verify the functioning of all your applications? This is not only a resource-intensive process, but it is also taking a massive hit on the accuracy of your test cases. It is high time that you start adopting automation testing practices to ensure that the app functions on multiple devices and browsers. For example, if you use Selenium, you could access dedicated browser drivers like Selenium ChromeDriver to perform these processes.
Excited to know more? Don’t worry! We are here for you. With this article, we’re going to understand how you can set up Selenium ChromeDriver to run your automation test cases on the Google Chrome browser. We will also understand some of the best practices, tips, and strategies that can assist you in this process.
Why Use Selenium ChromeDriver
While we start discussing about the Selenium ChromeDriver setup process, it is very important to justify the choice of this tool, considering there are other alternatives available in the market. We have chosen Selenium as it is one of the most popular open-source platforms to execute automated web app testing.
Many developers often confuse Selenium as a standalone tool. In reality, it is a test suite that consists of multiple different tools which will help you at different stages of the application development and testing process. Among all the other tools within the Selenium test suite, we would like to highlight the Selenium WebDriver.
This is because this WebDriver is responsible for not only starting the testing process but also executing it on all the respective elements of your web application. Since this tool was added, the developers can run the test cases in the native environment of a browser without worrying about any dedicated test engine.
While using the Selenium WebDriver for running your test cases, you will require dedicated browser drivers depending on your target browsers. If you are aiming to make your application compatible with Google Chrome, you will have to use the Selenium ChromeDriver.
Let us now divert our attention towards some of the major factors that justify why Selenium with ChromeDriver is a very powerful combination in itself:
- With this, you can implement cross-platform support. So? You can test the functioning of your app on Chrome while running it on more than one operating systems, like Windows, Mac, and Linux.
- Thanks to the open-source architecture, you do not have to worry about any licensing fees or being locked into a single ecosystem. It also has a huge community of developers who are always ready to help you whenever you are stuck with any feature of this tool.
- With the Selenium ChromeDriver, you can automate real-world scenarios using real browser interactions. It will be a very important parameter to ensure that your application remains functional when exposed to multiple user interactions.
- Finally, it is a highly flexible setup as it does not bind you to any single programming language. You can write the automation test scripts in any of your own languages, and then the system will automatically convert them into a language that it can natively understand.
If you’re still unaware about the functioning of ChromeDriver, it is the bridge which will help you connect the Selenium scripts with the Chrome browser. It will also implement the WebDriver protocol so that Selenium can control the Chrome functions programmatically and implement the testing parameters.
See also: How Biotechnology and AI Are Merging
Prerequisites For ChromeDriver
Excited about using the Selenium ChromeDriver for running your web automation test cases? To help you with this process, we will be listing out all the required steps for this process, but before we jump into the steps, you need to follow certain prerequisites to ensure that you have all the required softwares and dependencies for this tool:
- It is very obvious that you must have Google Chrome installed on your system to run the test cases. The version of your Google Chrome should also match the version of the ChromeDriver that you will be using.
- Based on your knowledge and choice, you need to install the programming language on your system. This language will be responsible for creating all the test cases. For this blog, we will be using Python to create our test scripts.
- The final prerequisite is to ensure that pip is installed and available within your testing environment. If you have also chosen Python as your preferred programming language, pip will be automatically bundled along with the installation file.
Steps To Set Up ChromeDriver
Now let us divert our attention towards all the steps that you must follow to set up ChromeDriver on your test environment for running your test cases:
1. Installing Selenium
The first step is to use pip to install the Selenium package. It is a very easy process as you simply need to enter the following line of code within the terminal window of ChromeDriver:
pip install Selenium
If you are still unaware about the installation process, you can use the code “pip show Selenium” to verify the installation and presence of Selenium within your test environment.
2. Download ChromeDriver
Now you need to download the ChromeDriver binary that works with your Chrome version. How? First, check your ChromeDriver version and then visit the official website to download the appropriate version of ChromeDriver for your OS.
The next phase of this process is to unzip the download file and move the executable to a known location that can be accessed by the system path during the testing process. You can also specify the system path within the code to make sure that it is accessible by the test engine.
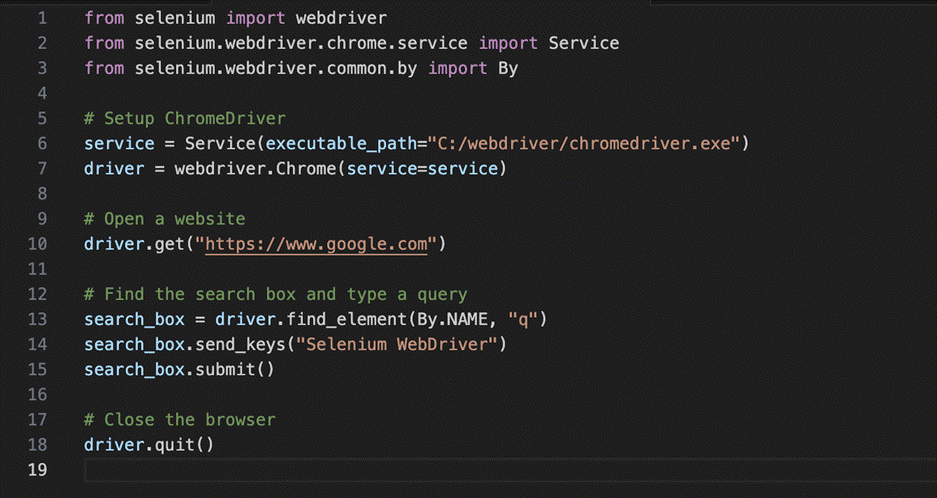
3. Write Your First Selenium Script
Now you’re finally prepared to write your first Selenium ChromeDriver test script for your application. To further help you understand this process, we are given a basic script written with Python programming language:
If you’re following the above script, you must replace the executable path with your actual ChromeDriver path.
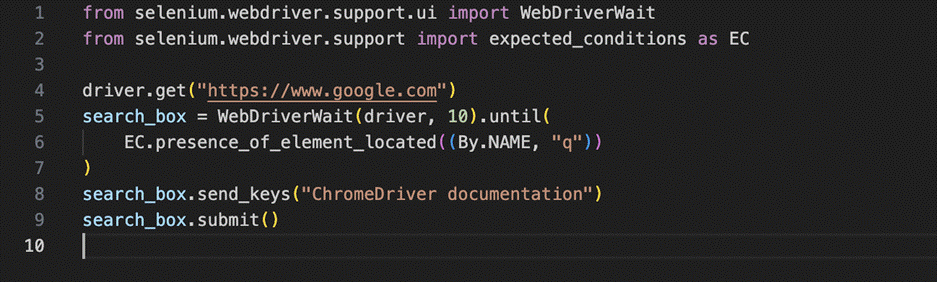
4. Automating Tests with WebDriverWait
Modern apps now use a new type of element known as dynamic elements. These elements can change their functioning or positioning depending on various backend configurations or user interactions. It can be a massive challenge testing the proper functioning of these elements.
When you’re using Selenium ChromeDriver, you need not worry as you have native access to WebDriver wait method that is specifically designed to perform this process.
Using this method, you can automatically pause the test execution process until the respective element becomes visible and usable. Then, the system will resume the testing process to complete the test cases and display the final test results to you.
To further help you understand how these WebDriver wait methods work, we have given a sample code that helps you perform the same process:
5. Handling ChromeDriver Updates
While you are using ChromeDriver for running your automated test cases, there will be a common scenario when you might need to update the ChromeDriver version to access new features. To perform the update in a smooth format without impacting the test process, you must follow the given steps:
- You should use tools like WebDriver Manager that can help you implement automatic ChromeDriver management as part of the management process. It will automatically update the ChromeDriver instance whenever it detects any significant change or bug fixes.
- You should also log the Chrome version within the continuous integration environments to ensure that the updates do not essentially impact the functioning of your existing versions or the functioning of the testing environment as a whole.
- It is also important to continuously monitor the version compatibility using official forums. For your reference, we have given the URL below:
Best Practices For Using Selenium ChromeDriver
Finally, let us divert our attention towards some of the best practices that we would recommend you to use while using Selenium ChromeDriver for running your web automation test cases. This is because we have created these practices to ensure that you’re improving the productivity and quality of your testing approach:
- Before you run the tests, make sure that you have the latest version of Google Chrome and the ChromeDriver on your system. It is equally important to ensure that both the versions are compatible so that you do not run into any unwanted obstacles during the execution process.
- We would recommend you to use “webdriver-manager” for auto management during the development process. This function will help you to ensure that all the test cases are being executed in the respective elements of an application and that the test reports are stored properly.
- To implement continuous integration and continuous deployment pipelines, you must consider pinning the version so that you can avoid sudden failures. Moreover, it is important to have a properly documented workflow for these agile methodologies so that your teams are prepared for any unexpected scenarios.
- You should start integrating test management frameworks like PyTests and TestNG so that you can implement a structured task execution process. This approach will also help you maintain a general understanding about the current status of the execution process.
- Real device testing is a very important part of web testing with Selenium ChromeDriver. However, considering the expense of this process, testers often avoid this step. The best solution would be to start investing in cloud testing platforms like LambdaTest. LambdaTest is an AI-native test orchestration and execution platform that lets you perform manual and automation testing at scale with over 3000+ browsers, OS combinations, and 5000+ real devices.
- You should start investing in advanced artificial intelligence and machine learning features within your Selenium test cases. For example, with this integration, you can use automated test case generation using natural language processing and self-healing test scripts using machine learning algorithms.
The Bottom Line
Based on all the areas that we went through in this article, we can easily come to the conclusion that setting up Selenium ChromeDriver may seem a very small step, but it is a very important parameter for the entire automation testing workflow. By using all the prerequisites, steps, and strategies that we have mentioned in this article, you can easily perform this process.
So, whether you are testing a simple login page or a complex web app, the ChromeDriver will help you create very smooth browser interactions to ensure the proper functioning of all these parameters. It’ll also help you to quickly find out the bugs and errors if any, so that you can remove them during the troubleshooting and debugging steps.